Original JYETech DSO-SHELL DSO150 15001K DIY Digital Oscilloscope Unassembled Kit With Housing

SKU487878
10 Reviews
USD 45.99
Wholesale Prices :
Qty: 4-7 >=8
Price: $27.89 $26.34
Qty:
In stock
30-day Return Policy, Learn More
Description
  • weight: 485 g
DSO Shell (DSO150) Oscilloscope DIY Kit:

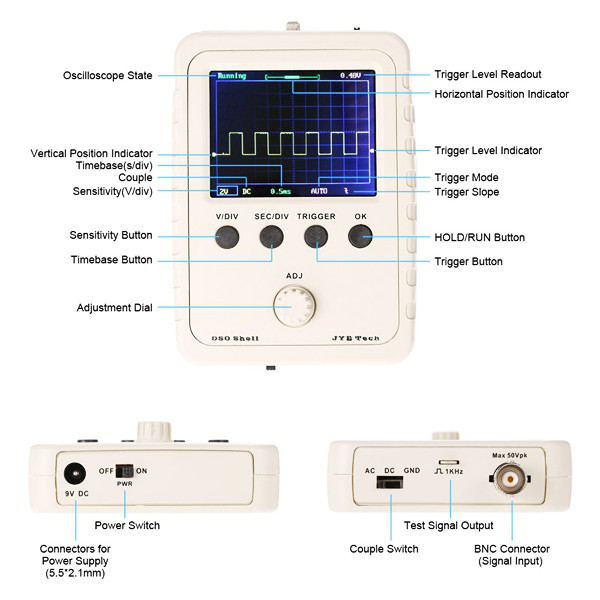
1. DSO Shell has similar bandwitch as DSO138 though it contains significant improvements in structure, mechanical, and operation.
2. Display and MCU are now mounted on the same board (mainboard) to avoid using inter-board pin-headers. Feedback from DSO138 usres have shown that soldering on the pin-headers are often problematic for many beginners. Analog channel is placed on a separated board which contains most user install parts. This brings in better separation between analog and digital circuits. Without the analog portion the mainboard is actually a general purpose control board that can be used in many other applications. The mainboard is fully installed (except a few through-hold components) and factory tested before packing.
3. DSO Shell comes with full enclosure. The front panel and top/bottom brackets are flexiable for easy user modification.
4. Rotary encoder has been added. It makes parameter adjustment much quicker and easier.
5. The sensitivity of DSO Shell has been extended in both directions and is higher and wider than DSO138. It reaches 5mV/div --- 20V/div while DSO138 is only 10mV/div --- 5V/div.
6. DSO Shell runs on 9V (do not use power voltage higher than 10V!) power supply. Users need to prepare their own power supply since it is not included in the kits. The power jack on the mainboard accepts standare 5.5mm/2.1mm DC plug. Alternative 2-pin connector (0.1 pitch) is also provided for convenience to connect to different power sources.

Important Notes:

It is assumed that users have adaquate soldering skills and troubleshooting skills to assemble the DSO Shell kits. Buyers are advised that due to skills of user is involved in assembly it is not guaranteed every kit will end up being a working device. But we will make as much efforts as we can to approach that goal.
After receiving the kits users are urged to check mainboard and LCD by applying proper power supply. Report immediately to us or JYE Tech if problem or damage is found.

Characteristics of indicators:

Number of channel: 1
Analog bandwidth: 0 - 200KHz
Sensitivity: 5mV/Div - 20V/Div
Sensitivity error: < 5%
Resolution: 12-bit
Input Impedance: 1M ohm
Maximum input voltage: 50Vpk
Coupling: DC, AC, GND
Max real-time sampling rate: 1Msps
Timebase: 10us/Div - 500s/Div
Record length: 1024
Trigger modes: Auto, Normal, Single
Trigger types: Rising/falling edge
Trigger position: 1/2 of buffer size fixed
2.4-inch color TFT LCD with 320 x 240 resolution
Power supply: 9V DC (please make sure the power supply is 9V, lower or higher than 9V will cause problems.)
Supply current: 120mA @ 9V
Dimension: 115mm x 75mm x 22mm
Weight: 100 gram (not including cables and power supply)

Update informations: Component accessories and PCB board made a number of changes
Firmwares: Click to open
Users Manual: Click to open
Mainboard Schematic: Click to open

Analog board Schematic: Click to open
How to Use the DSO150 Library: Click to open
Source codes: Click to open
FAQ, Tips, and Troubleshooting: Click to open


Package includes:

1 x DIY DSO150 Digital Oscilloscope Kit (There may be a color difference)
1 x EN Instruction

Original JYETech DSO-SHELL DSO150 15001K DIY Digital Oscilloscope Unassembled Kit With Housing

Original JYETech DSO-SHELL DSO150 15001K DIY Digital Oscilloscope Unassembled Kit With Housing

Original JYETech DSO-SHELL DSO150 15001K DIY Digital Oscilloscope Unassembled Kit With Housing

Original JYETech DSO-SHELL DSO150 15001K DIY Digital Oscilloscope Unassembled Kit With Housing

Original JYETech DSO-SHELL DSO150 15001K DIY Digital Oscilloscope Unassembled Kit With Housing

Original JYETech DSO-SHELL DSO150 15001K DIY Digital Oscilloscope Unassembled Kit With Housing

Original JYETech DSO-SHELL DSO150 15001K DIY Digital Oscilloscope Unassembled Kit With Housing

Original JYETech DSO-SHELL DSO150 15001K DIY Digital Oscilloscope Unassembled Kit With Housing

Original JYETech DSO-SHELL DSO150 15001K DIY Digital Oscilloscope Unassembled Kit With Housing

Original JYETech DSO-SHELL DSO150 15001K DIY Digital Oscilloscope Unassembled Kit With Housing

More Details


customers reviews ( 10 )

5 / 5.0
5 stars 100%
4 stars 0%
3 stars 0%
2 stars 0%
1 stars 0%

By transferx

TR
I have modified it to work with a li-ion battery with mt3608 step-up converter and tp4056 usb li-ion charger. Also, the battery itself has a protection module. Now, it can also output on 9v dc, so I can use it to power other devices. Seems to work without problem. I have not removed R30 and did not use the switch, instead, I have connected a switch directly to the output of the battery.
2020-02-13 00:00:00

By foksa

RS
This is both fun to build kit and great little oscilloscope. Assembly is relatively straightforward and there are lot of tutorials online. Finished oscilloscope works good, and only thing you might want to improve is to get better probe: http://bit.ly/2CpPhuq
2018-02-26 00:00:00

By reru48

DE
I have added an USB-UART (serial) converter and have flashed an extended firmware from toshi, see http://www.jyetech.com/forum/viewtopic.php?f=19&t=1206#p4062 I have described the modification to export the waveform data and plot it in program GNUplot under Ubuntu, Mac OS and Windows, see: http://www.rudiswiki.de/wiki9/JyeTechDSO150
2017-10-17 00:00:00

By Belik

UA
отличный не дорогой конструктор. Собирать, одно удовольствие. Единственное что не понравилось, это питание от 9Вольт. Но я решил эту проблему интегрировав внутрь корпуса литиевый аккумулятор от телефона, подключив его через повышающий DC-DC преобразователь подняв напряжение до требуемых 9В а также снабдил контроллером заряда аккумулятора. И получился полностью портативный осциллограф в отличном корпусе.
2017-08-07 00:00:00

By D1rTy_H4rRy_GR

GR
The assembly is pretty easy and for me was trouble free of wrong parts. I think I understood correctly the calibration (it works OK for me). I did, as another user mentioned, fit a flat 950mAh LiPo with a step-up and a charging circuit with an opening to the side for a USB charging. It\'s great you should do it. Take note that because you use battery as a source to the step-up you can eliminate the input capacitor without much of a problem. And also you can cut pieces of the step-up PCB as long as you can keep the traces (the ground is common to input and output ;) and is usually the bottom layer). Trim any throu-hole lids and protect with electrical tape! Only problem is that the step-up draws some minimum current even if the unit is off, so you should remember to charge it regularly (my charging circuit protects from undervoltage thought).
2017-06-28 00:00:00

By Morten

NO
A small portable scope. The soldering is a bit tedious, but by no means difficult. Seems to work fine, the little testing I've been doing so far. You probably do not want to run it off a 9 volt battery since it draws a bit too much juice, but if you have to, it works fine. Just beware that there is no room for a battery inside the box, so it must be external.
2017-02-18 00:00:00

By mxim2

AT
From an educational point of view, this is a good kit. This new kit is a bit more compact than the DSO138. Ultimately, it has similar limitations - this is more like a different form factor than a proper upgrade. Anyway, it has a very reasonably frequency range for its price point. I uploaded some pictures during my assembly. Many parts, such as the rotary encoder, are marked on the pcb silkscreen - this helps with the correct orientation of the components. For me, It the assembly took 2-3 hours. The hardest part was finding the correct resistor values - soldering marked SMD resistors, such as 0805s, would be easier and faster. I think the pin headers have a pin pitch of 2 mm - everything is a bit smaller in comparison to a regular protoboard, which makes soldering a bit more challenging. The current firmware seems to have a few issues. there are a few threads in the official jye tech forum (jyetech.com/forum) regarding calibration issues, I hope these will be corrected soon. quote: "We can confirm that the 0.1V test signal contains a +3.3V offset due to a bug in firmware. This will be corrected in the up coming firmware release. For the time being please use AC coupling for the adjustment of C3. We are sorry for the mistake."
2016-12-29 00:00:00

By therealprof

DE
I just finished building it so here're my impressions from the build procedure: The manual does *NOT* specify the direction parts should be facing towards nor can it easily be seen from the images which is quite easy to get wrong since the main board has to be soldered on two sides; I the test knob on the wrong side of the board, then II managed to get the rotary switch board assembled upside down which was a major PITA to correct and I had to cut the connector and use a new one (which I then also soldered in facing into the wrong direction). It is not clear whether the switch on the analog board should be flush with the board or be elevated. I assumed it should be elevated because otherwise I would have needed to deform the outer pins in order to push it all the way in; making the holes small enough is usually a sign that the designer wanted to have some distance between the board and the switch... In retrospective it seems that assumption was wrong. The troubleshooting tips are pretty much useless, it's almost impossible to have any of the defects listed there. The test points are easily useless, most don't say what "good" values are and what to do if they're not good, others vary with the input voltage and "good" is defined as a very wide range. The calibration is crappily explained; I figured out what C3 does by myself but it would have been nice to know what to look out for instead of trying to compare it to the barely readable images next to it. I still have no idea what C5 does, didn't seem to have any effect for me; it's also a bit annoying having to take the analog board off to make changes and then put it back on to see the effect; the variable caps should be facing to the side instead of into main board, I'm also pretty sure that could be automised...
2016-12-07 00:00:00

By GSANV

RU
Хороший набор. Радует наличие хорошего корпуса. Собирается легко, комплект полный, только надо быть внимательным с какой стороны что паять. Первое тестовое подключение делается только с платой, где экран и без энкодера. После надо выпаять резистор - перемычку на плате. Для своей цены вполне функциональная вещь. Кроме обычного показа сигнала есть память (долговременная). Можно записать и хранить или кому показать. Кроме этого на экран выводятся статистические данные сигнала. Не хватает щупа с делителем, но его можно докупить здесь отдельно. Нужен блок питания на 9 вольт и желательно без пульсаций. Из недостатков - очень маленькие отверстия под длинные винты корпуса. Боялся сломать пластик, пока завинчивал (очень туго шли), но все получилось хорошо.
2016-12-05 00:00:00

By norwenkel

DE
Just received the DSO 150 with pre solder SMD parts. About 2 hours are needed to solder the needed parts. After doing the voltage function tests and calibration of the probe the two boards are mounted into the cover. Adding an external 9V power supply and ready to go. By the way, test voltage V4 shows up 1.5 V instead of the mentioned 1.61 V. Hope that´s ok! Just a short hint: Do not use a normal 9V battery. It will last just for a short time and you can be not sure if the DSO 150 display correct data.
2016-11-09 00:00:00